The code samples in this blogpost are outdated. Find more recent information in our iOS documentation/Android documentation.
PlotProjects already provides the means to send notifications to users when it matters the most; when they are near a location that is relevant to them. To further increase the relevance of the notifications for your users, you can use the Notification Filter.
*This blog was written by PlotProjects, the leading provider of geofencing and location-based technology. If you’re a business with an app, contact us to find out more about how our platform can drive results for your business.
With this feature you can only show notifications that match the preferences of your users and personalize these messages. That is the use case we further elaborate on. Other use cases for the Notification Filter could be to smoke test your notifications or to prevent sending a notification multiple times to the same person across apps.
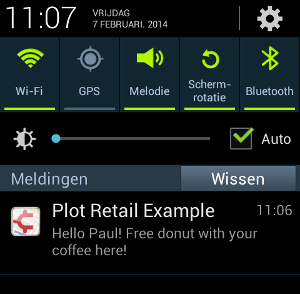
Example of Personalized Notification
This functionality is available for native Android and IOS apps.
IOS
You can use the Notification Filter in iOS by implementing this method in your AppDelegate: -(void)plotFilterNotifications:(PlotFilterNotifications*)filterNotifications. This method will be called every time Plot detects that the user is at a location you have defined a notification for in our dashboard (which the user did not receive before).
The object PlotFilterNotifications has the property uiNotifications, which contains all notifications that are at the current location of the device. You can modify the text of these notifications by doing the following:
-(void)plotFilterNotifications:(PlotFilterNotifications*)filterNotifications {
    for (UILocalNotification* localNotification in filterNotifications.uiNotifications) {
// makes the notification body string personalized
        localNotification.alertBody = [NSString stringWithFormat:@"Hello Paul! %@", localNotification.alertBody];
    }
The “data” field of a notification allows you to add custom information to a notification that you can access in the Notification Filter or Notification Handler. Plot doesn’t prescribe a format for this data. You could use plain text as in this example, or for example use JSON. You can get it out by reading the PlotNotificationDataKey (constant defined in plot.h) from the userInfo dictionary of the UILocalNotification.
You can change all fields of the UILocalNotification, except fields that are related to scheduling. For a reference of all fields you can change, you can check the Apple IOS Documentation.
When you are done modifying these notifications, you can tell Plot you want these notifications sent with the method showNotifications:(NSArray*)uiNotifications on PlotFilterNotifications. By omitting notifications that are not relevant for this user, you improve the user experience of your app. You can for example check whether the user has subscribed to the specific category of the notification.
// A complete example limits notifications to a specific category and personalizes these notifications
-(void)plotFilterNotifications:(PlotFilterNotifications*)filterNotifications {
    NSMutableArray* notificationsToSend = [NSMutableArray array];
    for (UILocalNotification* localNotification in filterNotifications.uiNotifications) {
        localNotification.alertBody = [NSString stringWithFormat:@"Hello Paul! %@", localNotification.alertBody];

        if ([[localNotification.userInfo objectForKey:PlotNotificationDataKey] isEqualToString:@"food"]) {
            [notificationsToSend addObject:localNotification];
        }
    }

    [filterNotifications showNotifications:notificationsToSend];
}
Doing network I/O from the plotFilterNotifications method may cause problems, because iOS won’t guarantee a continuous time window to execute your code, which may cause your connection to timeout. Therefore it is recommend to store the data you want to use locally. When a cooldown period is defined, only the first notification is shown. The other notifications will be offered again later to this filter.
When you have enabled the data protection feature of iOS, you have to ensure that the files you read in the filter are readable when the phone is locked. This can for example be done by setting the protection level of these files to None or CompleteUntilFirstUserAuthentication.
Android
To get a Notification Filter in Android you have to create a service which extends from the abstract class com.plotprojects.retail.android.NotificationFilterReceiver. That class defines one abstract method you have to implement yourself.
public class MyNotificationFilterReceiver extends NotificationFilterReceiver {
    @Override
    public List<FilterableNotification> filterNotifications(List<FilterableNotification> notifications) {
        // Your implementation...
    }
}
And you have to add it to your AndroidManifest.xml in the application element:
<service android:name=".MyNotificationFilterReceiver" />
This method is called every time Plot detects that the user is at a location you have defined a notification for in our dashboard. You get a List with all the notifications that have a geofence you are currently in.
public List<FilterableNotification> filterNotifications(List<FilterableNotification> notifications) {
    for (FilterableNotification notification : notifications) {
        notification.setMessage("Hello Paul! " + notification.getMessage());
    }
    return notifications;
}
Also in Android you can read the Data field that you can specify in the dashboard. This allows you to add custom information to a notification that you can access in the Notification Filter or Notification Handler. Plot doesn’t prescribe a format for this data. You could use plain text as in this example, or for example use JSON. The data is available using the getData() method on FilterableNotification.
The notifications you return in that method are shown to the user. The following example shows how to send only notifications that have “food” entered in the Data field.
// A complete example limits notifications to a specific category and personalizes these notifications
public List<FilterableNotification> filterNotifications(List<FilterableNotification> notifications) {
    ArrayList<FilterableNotification> notificationsToSend = new ArrayList<FilterableNotification>();

    for (FilterableNotification notification : notifications) {
        notification.setMessage("Hello Paul! " + notification.getMessage());

        if ("food".equals(notification.getData())) {
            notificationsToSend.add(notification);
        }
    }
    return notificationsToSend;
}
When a cooldown period is defined, only the first notification is shown. The other notifications will be offered again later to this filter.
In Android you have the possibility to completely replace the notification to be sent with setNotification(). This allows you to have a notification with a rich notification custom layout. You can read more about what rich notifications are in the Android Developer Manual.
Further Information
When you have further questions, please don’t hesitate to contact us. You can find more information in our documentation.
When you don’t have an account yet, you can create one here. Start sending location based notifications from your app today in Android and iOS.
Are you a business with an app?
Do you need support with geofencing and location-based marketing? Then contact PlotProjects today. With many years of experience and expertise, our solution is hailed as the best in the industry for both big and small businesses alike.